
Imagine a dish that captures the essence of the Mediterranean, blending fresh spinach, creamy feta, and a hint of olive oil into a golden, flaky pastry. This is spanakopita, a classic Greek spinach pie recipe that has delighted palates for centuries. Originating from the heart of Greece, this savory pie is a staple in Mediterranean cuisine, cherished for its rich flavors and hearty texture.
In this article, we’ll guide you through the traditional and modern ways to craft this beloved dish. From professional tips to essential ingredients, we’ll cover everything you need to create an authentic spanakopita. Whether you’re a seasoned cook or a curious beginner, this detailed guide will walk you through assembling, baking, and serving this iconic pie like a pro.
Key Takeaways
- Discover the authentic recipe for Greek spinach pie, spanning traditional and modern variations.
- Learn how to layer flaky phyllo dough for the perfect texture.
- Master the balance of fresh spinach, feta cheese, and olive oil for a genuine Mediterranean taste.
- Explore professional tips for achieving a golden, crispy crust.
- Find step-by-step instructions for assembling, baking, and serving spanakopita.
Introduction to Greek Spinach Pie
Spanakopita, a dish deeply rooted in Mediterranean tradition, is a culinary masterpiece that has won hearts across the globe. This delightful creation, often enjoyed at family gatherings and festivals, showcases the rich cultural heritage of its origins.
A Brief Look at the Dish’s Mediterranean Heritage
Originating in the Mediterranean, spanakopita reflects the region’s love for fresh ingredients and layered flavors. It’s a versatile dish that can be served as an appetizer, side, or even a main course, making it a favorite in many households.
What Makes Spanakopita So Irresistible?
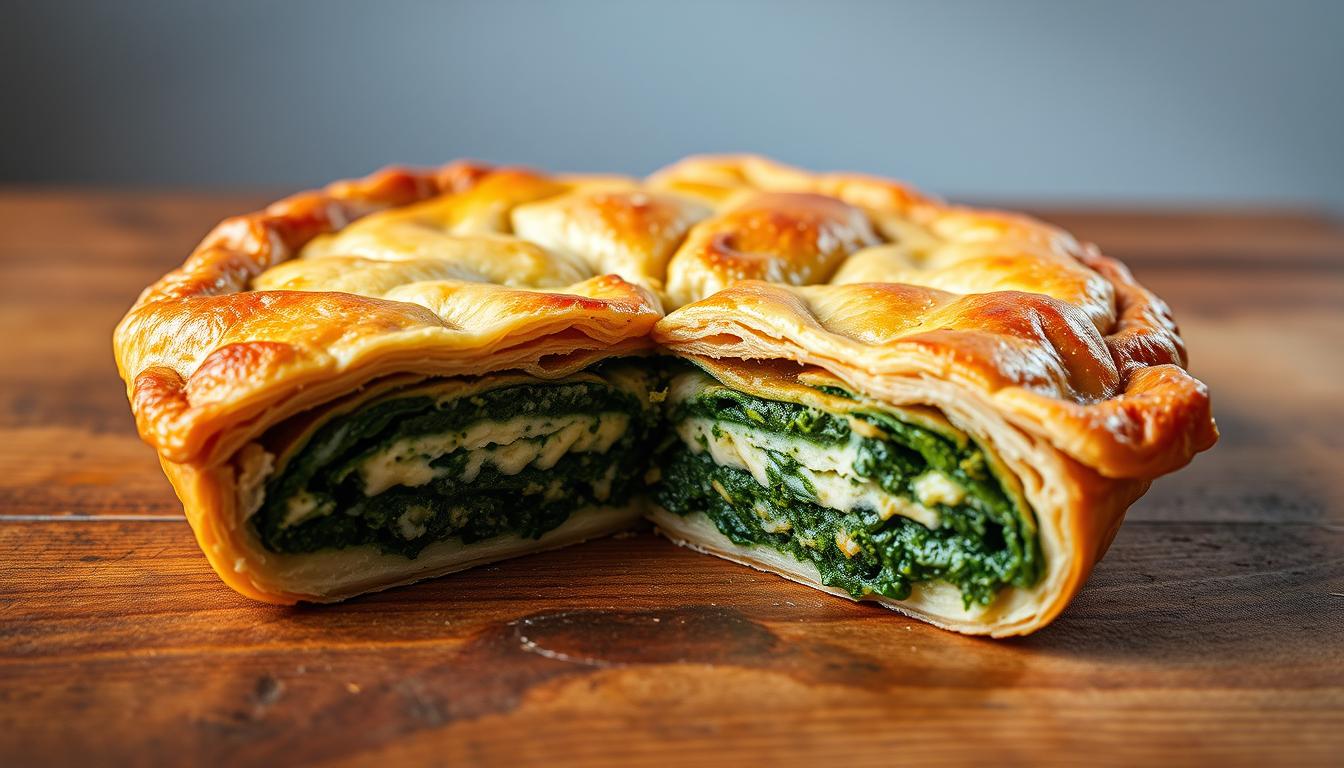
The magic lies in its ingredients. Fresh spinach, creamy feta cheese, and a touch of olive oil blend harmoniously, creating a flavor profile that’s both earthy and refined. The crispy phyllo layers add a satisfying texture, while subtle aromatic hints enhance its appeal. Whether you’re a food enthusiast or a casual diner, spanakopita promises an unforgettable experience.

Key Ingredients and Essential Tips for Perfect Greek spinach pie
Creating an authentic dish begins with selecting the finest ingredients. Each component plays a vital role in achieving that perfect balance of flavors and textures.
Choosing Quality Olive Oil, Spinach, and Feta Cheese
Start by selecting high-quality olive oil, as it enhances the dish’s authenticity. Use organic olive oil for the best flavor. Fresh spinach is ideal, but frozen spinach works well if drained thoroughly to avoid sogginess. For the cheese, opt for authentic feta, preferably from sheep’s milk, to ensure a tangy, creamy element.
Fresh Versus Frozen Spinach: What You Need to Know
Fresh spinach offers vibrant flavor but requires more prep, while frozen spinach is convenient and equally nutritious if drained properly. Both options can yield a delicious result when handled correctly.

The “fill” of your spanakopita should balance creamy and crunchy textures. Ensure precise measurements for each ingredient to maintain this harmony. Draining spinach thoroughly is crucial to prevent a soggy filling, so don’t skip this step. With these tips, you’ll craft a dish that’s both authentic and delightful.
Step-by-Step Guide to Assembling Your Greek Spinach Pie
Assembling your spinach pie is a straightforward process that ensures a delicious and visually appealing result. Each component plays a crucial role in achieving the perfect texture and flavor.
Preparing the Rich and Flavorful Filling
Mix well-drained spinach with crumbled feta cheese, eggs, and seasonings. This blend creates a creamy, savory filling that’s both hearty and flavorful.
Layering Phyllo Dough for an Irresistibly Crispy Texture
Begin by lining your baking pan with phyllo sheets, brushing each layer with olive oil. This step is essential for achieving a golden, crispy crust. After placing the filling, overlay the remaining phyllo layers, ensuring each is brushed with olive oil for optimal crispiness.
| Layer Type | Quantity | Notes |
|---|---|---|
| Phyllo Sheets (Bottom) | 5 | Brush each with olive oil |
| Filling | 1 | Spread evenly |
| Phyllo Sheets (Top) | 3 | Brush each with olive oil |
Each layer contributes to a perfectly crispy texture when baked. Follow these steps to assemble your pie like a pro!
Working with Phyllo Dough: Expert Techniques
Mastering phyllo dough is essential for creating a delicious and visually appealing spanakopita. This delicate pastry requires careful handling to achieve the perfect texture. Let’s dive into expert techniques to help you work with phyllo dough like a pro.
Thawing and Handling the Delicate Phyllo Sheets
Thawing phyllo dough is the first step to ensuring workable sheets. Place the dough in the refrigerator overnight, allowing 12-14 hours for it to thaw properly. Once thawed, let it rest at room temperature for about an hour before use. This step ensures the dough remains pliable and easy to handle.
To prevent the sheets from drying out, keep them covered with a damp kitchen towel. This simple tip will maintain the dough’s moisture and prevent tears. Remember, patience is key—spending an extra minute on setup saves time later.
Proper Brushing and Layering for Optimal Crispiness
Brushing each phyllo sheet with olive oil is crucial for achieving a golden, crispy texture. Use a light touch to avoid soaking the sheets, which can lead to sogginess. Work with one sheet at a time, brushing and layering to ensure even coverage.
| Step | Action | Tips |
|---|---|---|
| 1 | Thaw Dough | Refrigerate overnight (12-14 hours) |
| 2 | Rest at Room Temp | 1 hour before use |
| 3 | Brush with Olive Oil | Light, even application |
| 4 | Layer Sheets | Work one at a time to prevent drying |
By following these expert tips, you’ll create a spanakopita with a perfectly crispy crust and a delicious filling. Remember, attention to detail in handling phyllo dough ensures a professional finish every time.
Enhancing Flavor with Feta, Herbs, and Aromatics
The secret to a memorable spanakopita lies in its balanced flavor profile, achieved by combining high-quality feta cheese, fresh herbs, and subtle aromatics. This section explores how these elements create a dish that’s both authentic and delicious.
Balancing Spinach with Fresh Herbs and Feta for a Classic Taste
The heart of a great spanakopita is the harmonious blend of ingredients. Crumbling feta cheese into the spinach mixture adds a tangy creaminess, while fresh herbs like parsley and dill provide a bright, fresh note.
| Component | Role in Flavor |
|---|---|
| Feta Cheese | Adds a tangy, creamy element |
| Fresh Herbs | Contributes freshness and balance |
| Aromatics | Enhances depth with onion and sugar |
Aromatics like finely chopped onion and a hint of sugar add depth without overpowering the dish. Traditional spanakopita recipes often include these touches to ensure a mild, almost sweet flavor profile that’s not overly salty.
Small details can elevate your spanakopita. A few drops of extra virgin olive oil on top or a sprinkle of fresh herbs can make a big difference in presentation and taste. These steps, passed down through generations, ensure your dish is both authentic and impressive.
Mastering the Greek Spinach Pie: Traditional and Modern Twists
Spanakopita, a beloved dish, beautifully blends tradition with innovation, offering a canvas for both time-honored methods and creative experimentation.
Family Tradition Versus Contemporary Adaptations
Traditional spanakopita often features layers of phyllo dough, spinach, and feta, prepared with techniques passed down through generations. In contrast, modern recipes introduce exciting twists, such as triangle-shaped servings and the addition of butter for extra richness.
Many families treasure their recipes, storing and printing them for special gatherings. These cherished recipes often include personal touches, making each spanakopita unique.
- Triangle servings offer a convenient and visually appealing presentation.
- Butter adds a luxurious touch, enhancing the phyllo’s crispiness.
- Experimenting with ingredients like herbs or spices can refresh the traditional flavor profile.
While honoring tradition, feel free to innovate based on your taste and the occasion. Whether it’s a family gathering or a modern brunch, spanakopita adapts beautifully, maintaining its authentic charm.
Serving Suggestions and Storing Leftovers
Spanakopita is a versatile dish that can be enjoyed in various ways. Whether you’re planning a family dinner or a casual gathering, this pie offers endless possibilities for serving. Let’s explore some creative ideas and practical tips for storing leftovers.
Pairing Your Spanakopita with Refreshing Salads and Dips
For a well-rounded meal, consider pairing your spanakopita with a crisp Greek salad or a refreshing side of tzatziki. The tangy flavors of these accompaniments complement the savory goodness of the pie. You can also serve it alongside hummus for a delightful contrast of textures and tastes.
Make-Ahead Tips and Freezing Guidelines
If you’re preparing for a busy day, assembling the spanakopita the night before and storing it in the fridge can save you time. When you’re ready to bake, let it sit at room temperature for about 30 minutes before placing it in the oven. For leftovers, store them in an airtight container in the fridge for up to 3 days or freeze for up to 3 months.
| Reheating Method | Temperature | Time |
|---|---|---|
| Oven | 325°F | 15 minutes |
| Container | Use a bowl or pan | Ensure even heating |
When reheating, the oven is your best bet for restoring crispiness. Simply place the leftover pieces in a preheated oven at 325°F for about 15 minutes. Avoid using the microwave to maintain the texture. With these tips, you can enjoy your spanakopita fresh from the oven, even on busy days.
Conclusion
With this comprehensive guide, you’re ready to craft an authentic and mouthwatering spanakopita. From selecting fresh ingredients to mastering phyllo dough techniques, each step ensures a delicious outcome. Remember, the key to success lies in balanced flavors and precise layering.
Feel inspired to experiment with both traditional methods and modern twists. Share your creations, and don’t forget to print or pin this recipe for future use. Happy cooking!