
Imagine sitting by a crackling campfire under a vast, starry sky, the aroma of freshly baked bread filling the air. This is the essence of damper bread, a timeless recipe that has been a staple in the outback for generations. Its simplicity and rich flavor make it a favorite for campers and home cooks alike.
Traditionally, damper was made with just flour, water, and a pinch of salt, cooked in the ashes of a campfire. Today, it’s often baked in an oven, but the spirit of the recipe remains the same. Whether you’re enjoying it with a dollop of butter or as a side to a hearty stew, this bread is a testament to the ingenuity of early settlers.
In this guide, you’ll learn how to make your own damper, from mixing the dough to baking it to perfection. With just a few ingredients and a little time, you can bring a piece of outback tradition into your kitchen.
Key Takeaways
- Damper is a simple, unleavened bread with deep historical roots.
- It can be baked in an oven or cooked over a campfire for an authentic experience.
- The recipe requires only a few basic ingredients like flour, water, and salt.
- Damper is versatile and pairs well with both savory and sweet toppings.
- This guide will walk you through the steps to make your own damper at home.
Introduction & Overview of the Recipe
There’s something magical about the simplicity of a bread that requires no yeast or complex steps. This is the essence of damper, a traditional recipe that has been a staple for generations. Its rustic charm and rich flavor make it a favorite for both campers and home cooks.

Unlike modern breads, this recipe uses just a few basic ingredients: flour, milk, salt, and sometimes a touch of sugar. The absence of yeast means it’s quick to prepare, making it perfect for busy days or outdoor adventures. The dough is mixed, kneaded, and shaped by hand, giving it a personal touch.
What Makes This Recipe Special?
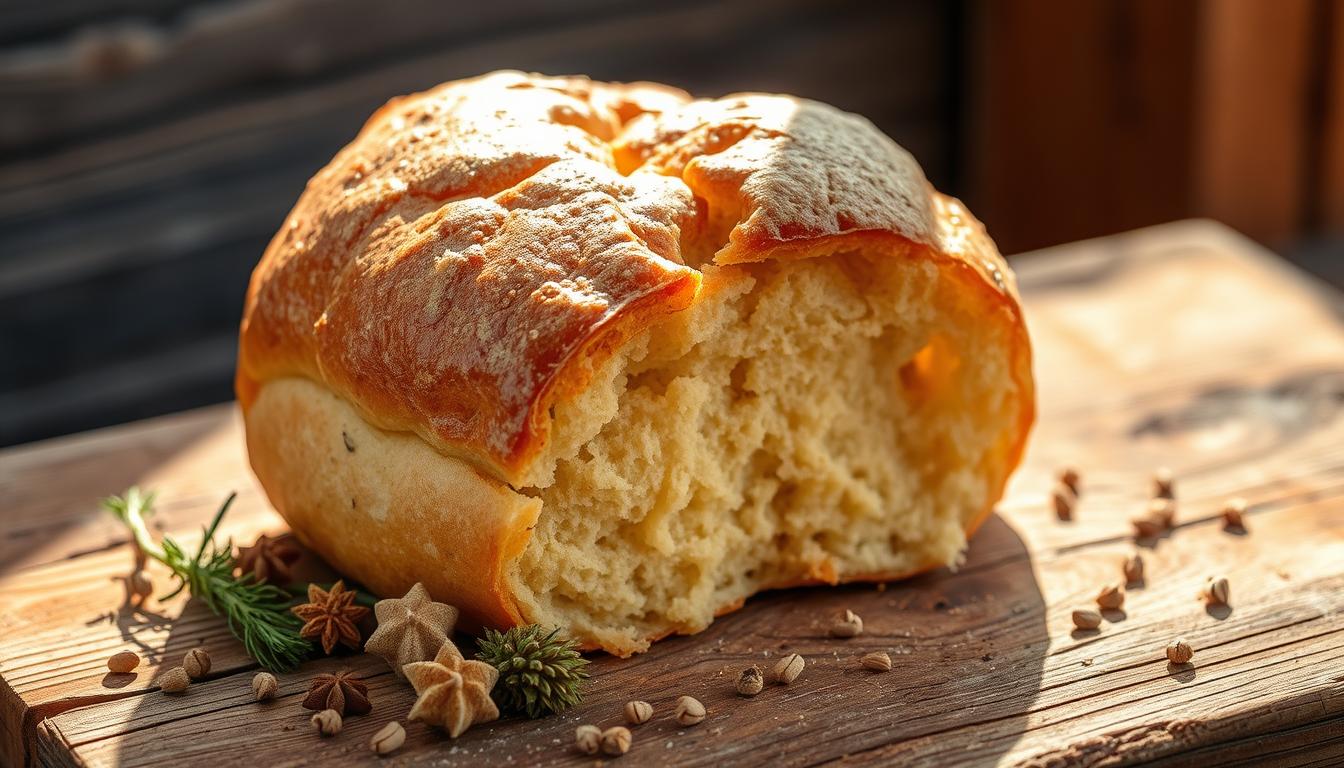
This recipe stands out for its simplicity and historical roots. It’s a bread that doesn’t rely on modern techniques or fancy equipment. Instead, it’s all about the basics: a bowl, a floured surface, and a little elbow grease. The result is a loaf with a golden crust and a soft, fluffy interior.
Another unique aspect is its versatility. You can enjoy it with butter and golden syrup for a sweet treat or pair it with savory dishes like stews. The flavor is mild, allowing it to complement a wide range of toppings.
Why You’ll Love This Recipe
Here’s why this recipe is a must-try:
- Quick Preparation: Ready in under an hour, it’s perfect for last-minute baking.
- Minimal Ingredients: You likely already have everything you need in your pantry.
- Traditional Techniques: Mixing and kneading the dough by hand adds a personal touch.
- Versatile Serving Options: Enjoy it sweet or savory, depending on your mood.
| Ingredient | Traditional Recipe | Modern Twist |
|---|---|---|
| Flour | Plain white flour | Whole wheat flour |
| Leavening Agent | Baking powder | Yeast (optional) |
| Liquid | Milk or water | Buttermilk |
| Sweetener | Golden syrup | Honey or maple syrup |
Whether you’re baking it in an oven or cooking it over a campfire, this recipe is a testament to the beauty of simplicity. In the next sections, we’ll dive into the detailed steps to help you master this timeless bread.
History & Tradition of Damper Bread
Long before modern ovens, a simple bread became a lifeline for travelers. This bread, known as damper, has deep roots in the lives of stockmen who roamed the outback. With just flour, water, and a pinch of salt, they created a sustaining meal that could last for days.

Origins Among Stockmen
In the 19th century, stockmen relied on damper bread during long journeys. It was easy to make with basic ingredients and required no special tools. They mixed the dough by hand and shaped it into a round loaf. This simple bread provided energy and nourishment in harsh conditions.
Traditional methods involved cooking the dough over coal or in the ash of a campfire. The bread was often scored with a cross using a knife. This not only helped it cook evenly but also held cultural significance, symbolizing unity and sustenance.
Traditional Cooking Methods and Evolving Practices
Early recipes called for minimal ingredients, but some stockmen added soda or even beer for extra flavor. The dough was placed directly onto the coals or wrapped in leaves to protect it from the fire. This method gave the bread a unique smoky taste.
Over time, cooking techniques evolved. Modern bakers now use ovens, but the essence of the recipe remains unchanged. The cross cut and round shape are still honored, connecting today’s bakers to a rich heritage.
This bread is more than just food. It’s a testament to the ingenuity and resilience of those who first made it. By learning its history, you can appreciate the traditions that continue to inspire this timeless recipe.
Essential Ingredients for a Great Australian Damper
The foundation of a perfect loaf lies in its ingredients, and this bread is no exception. Each component plays a vital role in achieving the right texture, flavor, and rise. Let’s break down the essentials and how to choose them wisely.
Choosing the Right Flour and Leavening Agents
Flour is the backbone of this recipe. Traditionally, self-raising flour is used, but you can also mix plain flour with baking powder. For every 3 cups of plain flour, add 4 ½ teaspoons of baking powder and ¾ teaspoon of salt. This ensures a light, airy rise.
Leavening agents like baking powder are crucial. They create the bubbles that make the bread fluffy. Avoid overmixing the dough to keep these bubbles intact.
Milk and water are the liquids that bind the dough. Milk adds richness, while water keeps it simple. For a balanced consistency, use a 1:1 ratio. If you’re camping, powdered milk is a handy substitute.
Salt enhances the flavor, and a teaspoon is usually enough. Butter, cold and cubed, adds a tender crumb. A tablespoon is sufficient for a rich, buttery taste.
Here’s a quick guide to the essential ingredients and their roles:
| Ingredient | Quantity | Role |
|---|---|---|
| Flour | 3 cups | Provides structure |
| Baking Powder | 4 ½ tsp | Creates rise |
| Salt | 1 tsp | Enhances flavor |
| Butter | 1 tbsp | Adds tenderness |
| Milk | 1 cup | Binds and enriches |
| Water | 1 cup | Simplifies consistency |
When combining ingredients, precision matters. Use measuring cups and spoons for accuracy. Mix until just combined to avoid a dense loaf. Quality ingredients are key to a perfect result.
With these tips, you’re ready to create a loaf that’s both authentic and delicious. The right ingredients make all the difference.
Mastering Australian Damper: Step-by-Step Recipe Instructions
Creating a perfect loaf starts with mastering the basics of mixing, kneading, and baking. Follow these detailed steps to achieve a golden crust and soft interior every time.
Mixing, Kneading, and Forming the Dough
Begin by combining 3 cups of flour, 4 ½ teaspoons of baking powder, and 1 teaspoon of salt in a large bowl. Use your fingers to rub in 1 tablespoon of cold, cubed butter until the mixture resembles breadcrumbs.
Gradually add 1 cup of milk and 1 cup of water, stirring until the dough comes together. Turn it onto a floured surface and knead lightly for about 1 minute. Shape the dough into a round loaf and place it on a greased baking tray.
Using a sharp knife, score a deep cross on top. This helps the bread cook evenly and adds a traditional touch.
Baking Techniques and Testing for Doneness
Preheat your oven to 390°F (200°C). Place the dough in the center of the oven and bake for 25-30 minutes. Keep an eye on the time to avoid over-baking.
To test for doneness, tap the bottom of the loaf. If it sounds hollow, it’s ready. Let it cool for a few minutes before slicing. This ensures the texture remains perfect.
For an even crust, rotate the tray halfway through baking. Adjust the oven temperature slightly if needed. Follow these steps precisely for a delicious result every time.
Tips & Tricks for Perfecting Your Damper Bread
Perfecting your bread-making skills doesn’t have to be time-consuming or complicated. With a few simple hacks, you can streamline the process and avoid common pitfalls. Whether you’re a busy camper or a home baker, these tips will help you achieve a delicious result every time.
Time-Saving Hacks for Busy Campers
When you’re short on time, efficiency is key. Start by pre-measuring your ingredients like flour, water, and sugar before you begin. Use tsp measures for precision and speed. Mix the dough quickly to avoid overworking it, which can lead to a dense loaf.
For campers, consider prepping the dough at home and storing it in a cool place. This saves time and ensures you’re ready to bake as soon as you reach your campsite. A sharp knife and a reliable cup are essential tools for quick prep.
Avoiding Common Pitfalls in Dough Preparation
One of the most common mistakes is over-kneading the dough. Keep it light and quick—just a minute or two is enough. Adjust the milk water ratio if the dough feels too dry or sticky. This ensures the right consistency for a fluffy texture.
Another tip is to keep an eye on the baking process. Overcooking can dry out your bread. Test for doneness by tapping the bottom—it should sound hollow. For added flavor, try experimenting with a little extra syrup or even a splash of beer, a traditional touch that adds depth.
Here’s a quick summary of best practices:
- Measure accurately: Use tsp and cup measures for precision.
- Mix quickly: Avoid overworking the dough.
- Monitor baking: Prevent overcooking by testing for doneness.
- Experiment: Add syrup or beer for unique flavors.
By following these tips, you’ll keep your bread light, tender, and perfectly baked every time.
Serving and Pairing Suggestions
The joy of freshly baked bread lies not just in its taste but in how you serve it. Whether you’re enjoying it warm from the oven or as part of a hearty meal, the right pairings can make all the difference. From classic spreads to creative twists, here’s how to make your loaf shine.
Classic Accompaniments Like Butter and Golden Syrup
Nothing beats the simplicity of a warm slice slathered with butter. The creamy richness melts into the bread, enhancing its soft texture. For a sweet finish, drizzle a bit of golden syrup on top. Its caramel-like flavor pairs perfectly with the mild taste of the loaf.
Other traditional options include jam or Vegemite for a savory kick. These spreads add depth and variety, making each bite unique. Serve your slices on a tray with a dusting of flour for a rustic presentation.
Creative Twists for a Unique Flavor Experience
For a more adventurous approach, pair your bread with hearty stews or savory soups. The soft interior soaks up the flavors, creating a satisfying combination. You can also experiment with toppings like roasted vegetables or a sprinkle of salt for added complexity.
Try serving it alongside a cup of your favorite beverage. Whether it’s tea, coffee, or even a glass of wine, the right drink can elevate the experience. For a festive touch, add a pinch of seasoning or a drizzle of honey for a unique twist.
Here are some ideas to inspire your next meal:
- Warm and Comforting: Serve with butter and a drizzle of syrup for a classic treat.
- Savory Delight: Pair with soups, stews, or roasted vegetables.
- Festive Flair: Add a sprinkle of seasoning or a dusting of flour for presentation.
The versatility of this bread makes it a staple for both casual and special occasions. Whether you stick to tradition or explore new flavors, the possibilities are endless.
Conclusion
Few recipes capture the essence of simplicity and tradition like this timeless bread. With just plain flour, water, and a pinch of salt, it has been a symbol of resourcefulness for generations. Whether baked in an oven or cooked over a fire, its rustic charm remains unmatched.
This bread is perfect for any day, from busy mornings to relaxed afternoons. Its soft interior and golden crust make it a versatile choice for both sweet and savory pairings. Serve it warm with butter or alongside your favorite stew for a hearty meal.
Try this recipe at home and connect with its rich heritage. With just a cup of milk and a floured surface, you can create a loaf that’s both comforting and delicious. Experiment with toppings and enjoy the joy of baking this classic bread.