
Game day is coming, and you’re getting hungry. Oven nachos are the perfect fix. They turn simple ingredients into a delicious dish in just 20 minutes. They’re great for any gathering or a solo treat.
Making homemade nachos is more than just mixing ingredients. It’s an art that combines ease with amazing taste. With a little chopping and simple steps, you can make nachos that taste like they came from a restaurant. Everyone will want your secret recipe.
Whether you’re an experienced cook or new to the kitchen, this guide will help you make the best oven nachos. They’ll be crispy, cheesy, and irresistible.
Key Takeaways
- Oven nachos can be prepared in just 20 minutes
- Minimal preparation required for maximum flavor
- Perfect for game day or casual entertaining
- Easily customizable with various toppings
- Suitable for both meat lovers and vegetarians
Why Oven-Baked Nachos Are the Ultimate Game Day Treat
Oven-baked nachos are the top choice for game day. They turn a simple snack into a hit with everyone. You need to know how to prepare and cook them right.

Oven-baked nachos are a big win for any party. Here’s why they’re the best choice for game day:
Perfect Party Portions
Nachos are great because they feed lots of people easily. With an oven, you can make big batches. Here are some tips for serving:
- Make nachos for 6-8 people per batch
- Use a big baking sheet for more coverage
- Layer ingredients well for even flavor
Temperature Control Benefits
Getting the temperature right is key for nachos. Baking at 350°F helps:
- Make cheese melt evenly
- Get chips crispy
- Heat ingredients well
Even Melting Advantage
The oven makes cheese melt perfectly. Use a mix of Cheddar and Monterey Jack (1.5 cups each) for the best results.
Pro tip: Check nachos every 3 minutes to avoid burning. This way, you’ll have a delicious dish that’s a game day winner!
Essential Ingredients for Perfect Homemade Nachos
Making delicious homemade nachos starts with picking the right ingredients. Your nacho journey begins with choosing top-notch parts. These will turn a simple snack into a tasty meal. Knowing the key ingredients is key to making great nachos.

Let’s look at the must-have ingredients for the best nacho experience:
- Tortilla Chips: The base of any great nacho dish
- Recommended weight: 14 oz (396.9 grams)
- Choose thick, sturdy chips to prevent sogginess
- Cheese: The melty magic that brings nachos to life
- Total cheese needed: 3 ¾ cups (886 ml)
- Mix of shredded cheeses for maximum flavor
- Protein Options:
- Ground beef: 1 lb (453.6 grams)
- Alternative proteins: Shredded chicken, black beans
Fresh vegetables can make your homemade nachos even better. Think about adding these tasty options:
| Vegetable | Quantity |
|---|---|
| Diced Bell Peppers | ½ cup (118 ml) |
| Red Onions | ¼ cup (59 ml) |
| Jalapeno Peppers | 1 pepper |
| Black Olives | 1/3 cup (79 ml) |
| Roma Tomatoes | 2 tomatoes |
Don’t forget the finishing touches! Add fresh herbs like chopped cilantro (3 tablespoons) and green onions. They add a burst of flavor. Serve with classic toppings like salsa, guacamole, and sour cream. This will make your nachos truly irresistible.
Choosing the Right Tortilla Chips for Baking
Choosing the right tortilla chips is key to a great nacho experience. The right chip gives your nachos a solid base. This ensures every bite is full of flavor and texture.
Thick vs Thin Chips: Finding the Ideal Base
Thickness is crucial when baking nacho chips. Thicker chips have several benefits:
- Better support for heavy toppings
- Less likely to become soggy
- Maintain crispiness during baking
Store-Bought vs Homemade Tortilla Chips
Your oven-baked nacho chips can come from two sources: store-bought or homemade. Here’s a comparison:
| Chip Type | Pros | Cons |
|---|---|---|
| Store-Bought | Convenient, consistent quality | Limited thickness control |
| Homemade | Custom thickness, fresh taste | Time-consuming preparation |
Our taste test of 10 tortilla chip brands found Xochitl as the best for nachos. Santitas Tortilla Triangles also stood out for their sturdiness and ability to hold toppings.
Pro tip: For homemade chips, use 5-6 inch corn tortillas, cut into triangles. Bake at 375°F for 12-14 minutes. This method makes crispy, delicious chips for your nachos.
The Art of Layering Oven Nachos
Making perfect loaded nachos is more than just throwing ingredients on a baking sheet. It’s all about layering to get that perfect mix of flavors and textures. Learning how to layer ingredients can turn a simple snack into a gourmet dish.
Begin with a big baking sheet to spread chips evenly. Use thick, sturdy tortilla chips as your base. They help keep your nachos crispy and prevent them from getting soggy.
- First layer: Spread tortilla chips in a single, even layer
- Second layer: Distribute protein evenly (ground beef, chicken, or beans)
- Third layer: Sprinkle first portion of cheese
- Fourth layer: Add additional toppings like corn, black beans, or diced vegetables
- Final layer: Top with remaining cheese
The secret to amazing oven nachos is layering. This way, every chip gets its share of toppings. Use wet ingredients like salsa or beans sparingly to keep chips crispy.
| Ingredient Layer | Recommended Quantity | Placement Tips |
|---|---|---|
| Tortilla Chips | 1 full baking sheet | Single, overlapping layer |
| Protein | 1/2 pound | Distributed evenly |
| Cheese | 2-3 cups | Split between two layers |
| Vegetables | 1 cup mixed | Scattered across layers |
Pro tip: Bake at 400°F for 12-15 minutes. This ensures your cheese is melted and your chips are crispy. Aim for golden, crispy nachos that are full of flavor in every bite.
Best Cheese Combinations for Melting Success
To make perfect nachos and cheese, you need to know about cheese melting. Choosing the right cheese is key for that gooey texture everyone loves.
Creating the ultimate cheese blend is all about making smart choices. Not all cheeses melt the same, so picking the right one is crucial for great oven nachos.
Recommended Cheese Types for Melting
- Cheddar (young, 0-1 year)
- Monterey Jack
- American cheese
- Havarti
- Colby
Cheese Melting Performance Comparison
| Cheese Type | Meltability | Flavor Profile |
|---|---|---|
| Young Cheddar | Excellent | Sharp, Tangy |
| Monterey Jack | Very Good | Mild, Creamy |
| American Cheese | Superior | Smooth, Consistent |
| Mozzarella | Good | Mild, Stretchy |
Shredding vs Pre-packaged Cheese
Freshly shredding your cheese makes a big difference. Pre-packaged cheese has additives that stop it from melting smoothly. Grating your cheese yourself gives your nachos a richer, creamier taste.
Pro Tip: Mixing two to three cheese types is best for flavor and melting. Cheddar and American cheese together often works the best.
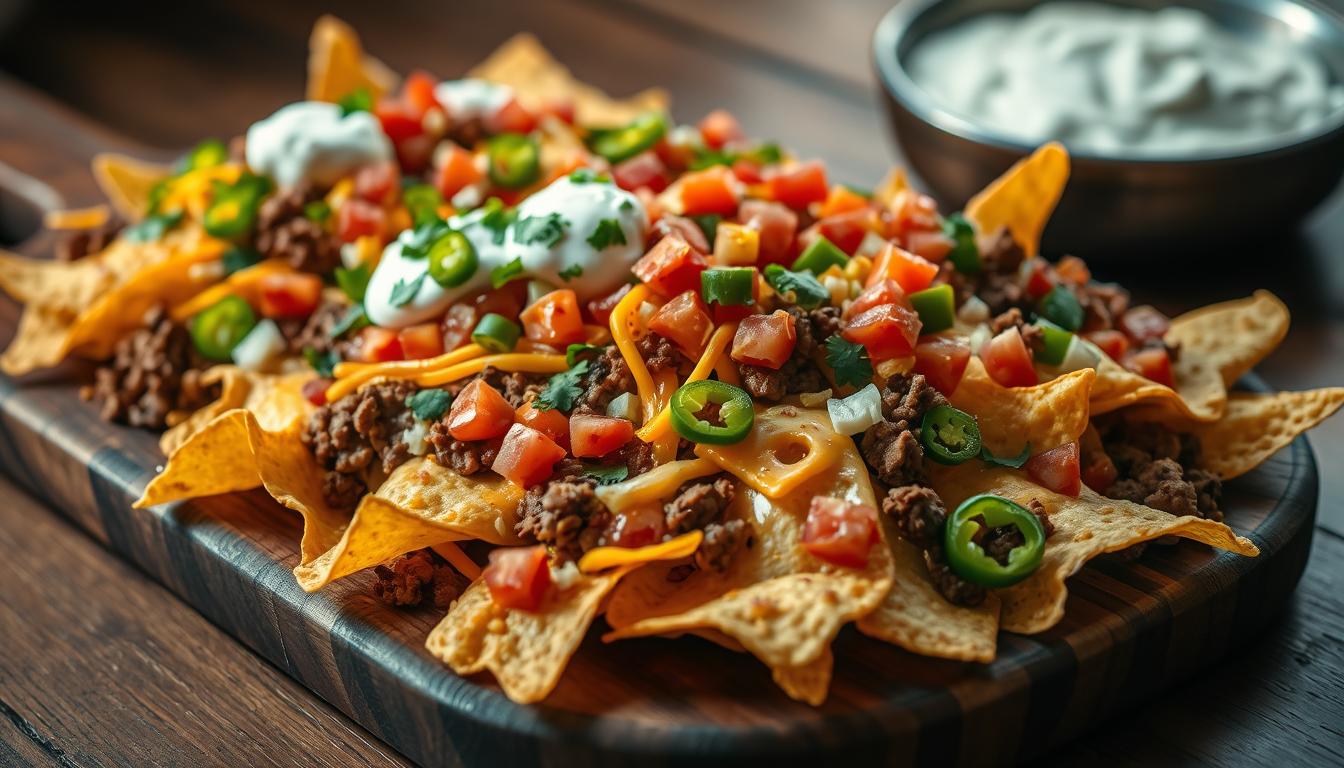
Fresh Toppings That Make the Difference
Making loaded nachos is more than just cheese and meat. The key is in the fresh toppings that make each bite special. The right toppings can completely change how you enjoy your nachos.
Fresh toppings add color, texture, and flavor to your nachos. Here are some must-try additions:
- Crisp Vegetables
- Diced roma tomatoes
- Sliced green onions
- Colorful bell pepper mix
- Herb Highlights
- Fresh cilantro
- Chopped parsley
- Spicy Accents
- Sliced jalapeños (about 5,000 Scoville units)
- Pickled red onions
To make the best homemade nachos, add these toppings right after baking. This keeps them crispy and flavorful. Try different combinations to find your favorite loaded nachos.
Pro tip: Cut veggies evenly and keep them at room temperature before serving. This keeps their texture and makes them blend well with your nachos.
How to Prevent Soggy Oven Nachos
No one likes soggy nachos. The goal is to make crispy, crunchy oven nachos. Moisture is the main enemy of tasty baked nachos. But, with the right methods, you can keep your nachos crunchy.
Proper Drainage Techniques
Wet ingredients can make your nachos soggy. Here’s how to keep them crisp:
- Drain canned beans thoroughly using a colander
- Pat wet ingredients like salsa or canned jalapeños dry with paper towels
- Use fresh ingredients sparingly
Strategic Layering Methods
The secret to crispy oven nachos is smart layering. Use sturdy restaurant-style tortilla chips that can handle toppings.
| Layering Strategy | Benefits |
|---|---|
| Chip Base Layer | Creates a crispy foundation |
| Cheese First Layer | Prevents direct moisture contact with chips |
| Protein Layer | Distributes weight evenly |
Pro tip for perfect oven nachos: Bake at 350°F for 8-10 minutes. This temperature ensures cheese melts perfectly without burning your chips. Use a wire cooling rack to improve air circulation and maintain crispiness.
Remember, smaller batches are key. The less time nachos sit with toppings, the crispier they’ll remain. Serve immediately for the best texture and flavor!
Protein Options for Loaded Nachos
Creating delicious loaded nachos starts with choosing the right protein. Whether you’re a meat lover or prefer vegetarian options, there are plenty of ways to make your nachos protein-packed and flavorful.
For meat enthusiasts, ground beef remains a classic choice for loaded nachos. A pound of ground turkey or chicken offers a leaner alternative that’s equally delicious. Pro tip: Season your meat with 1.5 tablespoons of taco seasoning per pound to amp up the flavor.
- Ground Beef (traditional option)
- Ground Turkey
- Shredded Chicken
- Pulled Pork
Vegetarian friends can enjoy loaded nachos too! Protein-rich alternatives include:
- Black Beans
- Pinto Beans
- Refried Beans (1 cup adds substantial protein)
- Plant-based meat substitutes
- Tofu crumbles
When preparing how to make nachos with protein, consider these nutritional insights. A standard serving of loaded nachos provides approximately 24 grams of protein, which is about 53% of the total calories. This makes nachos not just a tasty treat, but a protein-rich meal option.
Remember, the key to great loaded nachos is balancing flavors and textures. Experiment with different proteins to find your perfect combination!
Creating the Perfect Nacho Sauce
Making the perfect nacho and cheese sauce can turn your homemade nachos into something special. Whether you’re making a classic cheese sauce or trying vegan options, the right sauce is key. It makes all the difference in your nacho experience.
To get the perfect nachos and cheese sauce, pay close attention to the ingredients. The right mix creates a smooth, creamy sauce.
Classic Cheese Sauce Recipe
Here’s a simple recipe for a delicious cheese sauce for your nachos:
- Prep time: 5 minutes
- Total ingredients cost: $2.78
- Yield: 1 serving
| Ingredient | Amount | Cost |
|---|---|---|
| Butter | 2 Tbsp | $0.28 |
| Flour | 2 Tbsp | $0.02 |
| Whole milk | 1 cup | $0.19 |
| Medium cheddar | 1.5 cups | $2.25 |
Tip: Use medium cheddar for a smoother sauce. Sharp cheddar might become grainy when melted.
Vegan Alternatives
If you’re looking for plant-based options, try a cashew-based queso sauce. It’s a tasty alternative to traditional cheese sauce. Cashews make a creamy base that’s similar to dairy cheese, with a rich flavor for your nachos.
- Soak raw cashews for maximum creaminess
- Blend with nutritional yeast for cheesy flavor
- Add spices like chili powder for extra kick
Nutritional highlights of the classic cheese sauce per serving:
- Calories: 183.1 kcal
- Protein: 8.13 g
- Fat: 14.65 g
- Sodium: 337.23 mg
Tips for Serving and Presentation
Presenting your game day nachos is more than just about taste. It’s about creating an experience that impresses your guests. The right serving strategy can turn your loaded nachos into a memorable feast.
Here are some key presentation techniques to consider:
- Use a large wooden board or cast-iron skillet for rustic appeal
- Create height and visual interest with multi-level serving
- Separate cold and hot toppings to maintain optimal texture
- Garnish with fresh herbs for a pop of color
Your nacho presentation can change based on the occasion. For casual game day gatherings, serving on the baking sheet is perfect. It encourages sharing and makes the atmosphere inviting.
| Serving Style | Best For | Presentation Tips |
|---|---|---|
| Baking Sheet | Casual Parties | Keep chips crispy, serve immediately |
| Wooden Board | Elegant Gatherings | Arrange toppings artfully, use garnishes |
| Individual Plates | Seated Dinners | Portion control, personalized experience |
Pro tip for game day nachos: Serve them right after baking. This ensures the cheese melts well and the chips stay crispy. Your guests will love the fresh, hot loaded nachos straight from the oven!
Storing and Reheating Leftover Nachos
Got leftover baked nachos? Don’t toss them out! With the right storage and reheating techniques, you can bring your oven nachos back to life. Enjoy a crispy, delicious snack.
Proper storage is crucial for maintaining the quality of your leftover nachos. Follow these key steps:
- Remove cold toppings like lettuce and guacamole before storing
- Place a paper towel in the storage container to absorb excess moisture
- Refrigerate within 2 hours of cooking
- Store for no more than 2-5 days
When you’re ready to reheat your oven nachos, the oven is your best friend for restoring crispiness. Here’s a foolproof method:
- Preheat the oven to 375°F
- Spread nachos in a single layer on a baking sheet
- Reheat for 5-10 minutes
- Check periodically to prevent burning
Pro tip: For extra crispiness, use the broiler at 500°F for 1-3 minutes. Just watch carefully to avoid burning your baked nachos!
Alternative reheating methods include:
- Air fryer at 350°F for 3-5 minutes
- Cast-iron skillet over medium heat for 5 minutes
- Microwave (less recommended, but quick) – 1 minute on high
Remember to ensure your nachos reach an internal temperature of 165°F. This keeps them safe and delicious. Enjoy your reheated oven nachos!
Conclusion
Making homemade nachos is more than a recipe. It’s a chance to show off your cooking skills. These oven nachos are easy to make and can impress anyone in just 30 minutes.
Starting to make perfect oven nachos means learning a few tricks. You’ll need to know about layering, choosing the right cheese, and keeping an eye on the temperature. Whether it’s for a game day or a family dinner, you can try different toppings and cheeses to please everyone.
Creating amazing nachos is all about mixing flavors and textures right. By using the tips from this guide, you can make nachos that taste like they came from a restaurant. Enjoy the process, be creative with your ingredients, and make these nachos your own special dish.
As you get better at making nachos, you’ll see it’s more than just food. It’s about making memories with the people you share them with. Nachos can turn any meal into a special moment of togetherness and deliciousness.